Aperture :
In optics, an aperture is a hole or an opening through which light travels. More specifically, the aperture of an optical system is the opening that determines the cone angle of a bundle of rays that come to a focus in the image plane. The aperture also determines how many of the incoming rays are actually admitted and thus how much light reaches the image plane (the narrower the aperture, the darker the image for a given exposure time).In combination with variation of shutter speed, the aperture size will regulate the film's or image sensor's degree of exposure to light. Typically, a fast shutter speed will require a larger aperture to ensure sufficient light exposure, and a slow shutter speed will require a smaller aperture to avoid excessive exposure.Reducing the aperture size increases the depth of field, which describes the extent to which subject matter lying closer than or farther from the actual plane of focus appears to be in focus. In general, the smaller the aperture (the larger the number), the greater the distance from the plane of focus the subject matter may be while still appearing in focus.How to know what is the Aperture :
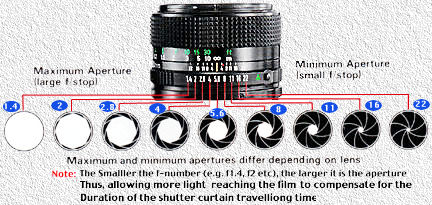
The specifications for a given lens typically include the maximum and minimum apertures, for example, f/1.4–f/22. In this case f/1.4 is the maximum aperture (the largest opening), and f/22 is the minimum aperture (the smallest opening). The maximum aperture tends to be of most interest, and is always included when describing a lens. This value is also known as the lens "speed", because it affects the exposure time.
Lenses with apertures larger than f/2.8 are typically known as "fast" lenses. The fastest lenses in general production are f/1.2 or f/1.4, with more at f/1.8 and f/2.0, and many at f/2.8 or slower.
Shutter Speed
It simply controls the amount of time the shutter is left open for light to come in and hit the sensor. I am saying sensor, but the old experienced folks may remember a time when the light was actually hitting film. Both the sensor and film collect light. The longer the shutter is open, they see more light - so the longer the shutter is left open the brighter your image will be. But shutter speed also affects other aspect of your image. Let's try and have a look, but first let's set the groundwork so we better understand each other .
When one is describing the technical setting of a picture, they note the shutter speed in seconds , they'll write 3 or 1/100 or 1/60. Inside the camera view finder you'll sometimes find a shorter form of display where the "1/" is assumed and only 100 or 60 will display. In that case, when you are setting the camera for one second or more you'll see two small lines next to the shutter speed setting: 2". To sum it up, 1/100 is like 100 and is faster the 1/30 (or 30); both are faster than 30".
Most cameras that offer minimal manual control will let you set the shutter speed in steps that double - i.e. 1/1000, 1/500, 1/250, 1/125 and so on. Each step will open the shutter for double the time from the previous step.
The natural question that pops to mind is "What shutter speed do I need to use?" The answer to this is both simple and complex, and mostly depends on what you are shooting. The following few points will help you to determine the right shutter speed for your picture:
Am I shooting a still or moving object? If you want to freeze your object and have it look sharp, you will need to assess its speed. The faster your object moves, the faster you need to set your shutter speed. If your object is moving toward/away from you, its speed has less effect then if it is moving from side to side.
It took a shutter speed of 1/1000 to freeze those storks .

What focal length (zoom) am I using? So, focal length effects something called blur. Blur is the name for those fuzzy images you see when your hand is moving while the shutter is open. The longer the shutter is open the steadier your hand should be to avoid blur. The rule of thumb is that the shutter speed should be 1/[Focal Length]. So if you are shooting with a 500mm lens, you should set your shutter speed to 1/500 or higher.
Am I using a tripod or an Image stabilizer? Both a Tripod and an image stabilizer will help you reduce or even eliminate blur. When using a tripod, you can set your shutter speed to virtually anything. A good image stabilizer will let you set a shutter speed about eight times slower than the rule of thumb previously discussed. Another option to reduce camera shake is to use a cable release.
Do I want my picture to look dynamic or static? Including both blurred objects and still objects is a good recipe for making a dynamic looking image. The following image has the biker still, while the road looks blurry and contributes to the fill of speed.

Image by Itai Belson (shutter speed - 1/100)
Shooting Stars - Shooting nightscapes is one of the more interesting ways to utilize the shutter speed control. By setting your shutter at a really low shutter speed (tens of minutes), you can see how the earth movement reflects in the starts positions. If you include both static objects (house, tree) and the sky, you will a wonderful star "line" contrasted by your static object.

Image by belial (shutter speed - 1 hour)
Shooting Waterfalls - When shooting a waterfall, set your shutter speed to a slow setting to get that silky look.

Image by Tony (shutter speed - 2.5 sec)
Shooting water - when shooting water in high speed, you can make the water look frozen. It will take a shutter speed of 1/500 or faster to make this magic happen. Another option to freeze water, is to use high speed flash photography.

Image by Jon Bradley (shutter speed - 1/1000)
Flash Rear Sync - this is when you set your flash to pop at the end of the exposure (Also known as flash second curtain sync). The burst of light coming from the flash will freeze the action, while the long exposure will give nice blurry trails.

Image by Banker (shutter speed - 1/125)

Image by WisDoc (shutter speed - 1/30)
One of the key factors to understanding photography in general and shutter speed in particular is practice, trial and error, so go out and take some shots. Try something different every time. Try long exposures, short exposures, moving objects, night photography. Then go back home and analyze your pictures. Is a picture blurry? Is it sharp? Does it show motion? Action? The more you will ask yourself those questions, the better grasp you will have over the shutter speed control.
To make this happen - here is a little photography assignment. Since shutter speed effects movement perception most of all, your simple assignment is to shoot something that is in constant movement - cars.
Stand on a sidewalk and take pictures of cars in varying shutter speed settings. Start with a fast shutter speed and slowly go down. Keep your zoom unchanged. Do this on a shady day so you can explore both fast and slow shutter speeds. When you analyze the pictures look for motion blur on the passing cars. See when other object become blurred due to your camera shake.
ISO :
“What ISO is best for my pictures?”
Changing the ISO setting on your camera changes the sensitivity to light of the image sensor inside of it.
The lower number that you select the less sensitive the sensor is to light (and conversely the higher the number the more sensitive it becomes).
This is useful when you are shooting in different lighting situations – particularly when there is low light and you might not be able to use a flash (you would bump up your ISO setting in this case).
The only cost of increasing ISO is that as you do it you will notice that the 'noise' or 'grain' in your shots also begins to increase.
You probably won’t notice this graininess on your images when looking at them on the LCD on your camera – however when you get them back to your computer they will become noticeable with higher ISO settings.
Here is an example that I have used previously with two images taken with exactly the same settings except for the ISO (100 on the left, 3200 on the right).

As a general rule you should choose the lowest ISO possible for smooth and grain-free shots.


